Wednesday, 31 January 2007

Traditional Squirrel Deadfall

Due to my very limited success with my improvised deadfalls, I decided to add a strictly traditional Norwegian setup to my line. The advantages of this design should be:
  • The trap is put into the squirrel's domain, the conifer trees.
  • The trap is set so high that it is harder for most predators to pick the squirrel out of the trap.
On the negative side, this trap involves quite a lot of extra work compared to the stone deadfalls. Use densly grained spruce or pine or preferably broken trees that has split naturally. That will save you a lot ow energy.

First chop the tree down. To give you as little chopping with the antler axe as possible, break it after only having chopped around slightly. Cut off where you find it to be a good length. Longer length makes for quicker action on collapsing.


Split it down the middle.


Wedge the bottom log between two trunks to make it sit securely. This will also make the upper log fall directly down. But you need to make sure you remove any twigs or cracked bark in the way, otherwise it will not fall freely.

I used a regular figure 4. I have found a way to make them more sensitive and more quickly producable with stone as tools and spruce twigs as materials.


The bait is walnuts, a bait I have had success with in previous years.

Tuesday, 30 January 2007

Pack Frame Update

Larch is not found naturally in Norway, but since I (unfortunately) live in a city at the moment, a lot of trees that are not natural is to be found there. Since larch was used on the original, I decided to go for this tree.


Larch is supposed to be exeptionally easy to split. That has to be trees with denser growth rings than this specimen. This one was quite hard to split properly, but the results were satisfactory. There was also a slight twist in the grain. But not more than I was able to even out on the planing.


Here my daughter seems to be working on something. Maybe she has some plans for the split log too.


Planing the planks thin and even takes a lot of time. Much more than one would expect it to. I used the big flakes I got from Kevin as drawknives and planers, alternating sides avoid digging into the twisted grain.


The ends were evened and notches were cut. To make sure that the frame isn't going to spread, one of the two boards are notched.


The only remaining task is now to mortise the frame and lash on the boards.

New Book Review

A new book review is up in the books review section. The book is "Bushcraft: Outdoor Skills and Wilderness Survival by Mors Kochanski. Thanks to Ian on bcuk (nick: elma) for giving me this book.

Monday, 29 January 2007

Veidemann Course

I thought I'll promote the Veidemann course this October again, which Backwoods Survival School will co-arrange with me. Patrick McGlinchey is a suberbly skilled man. Particularily known for his beautiful fishing equipment on display at BCUK and PaleoPlanet.

Here is the link to the Veidemann Course, almost to the bottom of the page. Photo is from this site.

Roycroft Snowshoes

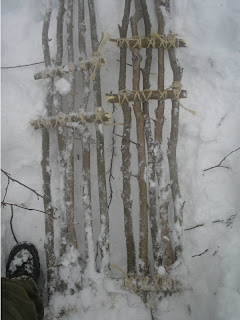
This type of survival snowshoes I have long wanted to build. I think they look horrible to be honest with you, but the simplicity was appealing. A warning: To save time, I used sisal ropes on this project. Sacrilegious, I know, but hopefully you will forgive me. :-)


First, You need ten small trees and 6 short halves. Try to use as small sticks as possible to reduce the weight. I used aspen, a very weak wood and consequently needed to use bigger sticks to compensate. If I'd used birch, rowan or even willow I would have been able to reduce the weight to more comfortable levels.


Anyway, bind 5 thick ends together onto a crosspiece, with some spacing. This will be the rear end.


Decide where the binding will be and bind another crosspiece onto it. The binding needs to be a little in front of the tipping point to make the snowshoes work properly. Measure where the heel of the shoe will fall and bind another crosspiece there.


Bind together the tip and lift it by binding it to the front crosspiece.


Make bindings. Just a thread over and one behind the shoe. Duplicate it to produce two snowshoes (hardly needed to say that, did I?).


Compared to traditional Canadian snowshoes, this is a terrible piece of equipment. Heavy and ungainly, but still far better than going without any snowshoes at all. For denser snow I would rather go for the traditional Norwegian style, which is much less encumbering. With the fluffy stuff we have here these days, you can clearly tell the difference. Below: Wading in the snow without snowshoes.

Sunday, 28 January 2007

New Book Review

A new book review is up in the book reviews section. The book is "Survival Skills of the North American Indians" by Peter Goodchild.

Hare Snare

An update on the deadfalls. The trap that didn't collapse last time had done so now, but there was no animal there. I don't know whether the trap wasn't heavy enough to kill it outright, if the squirrel managed to dodge the trap or whether a predator has taken my quarry. If it hadn't snowed so heavily the last days I'd probably see it from the tracks, but they were all gone. I reset the trap a little higher up and with a paiute trigger instead of a figure 4.


This is staged, the noose is too small and too high up, but you get the idea. There seems to be virtually no hares in around this city. Probably due to everyone walking their dogs.

Over a hare trail, find a branch of decent thickness, break off the branches and the top.


Tie a forked stick to a standing tree, or break a suitable branch standing in a good position.


Tie the noose to the the bent down tree. Stretch it out with two small sticks.


When the hare struggles to get loose, the bent branch pops out and tightens the snare even more. If you have sufficient lenght on the bent over tree, the whole hare might become suspended. Below: The triggered snare.

Saturday, 27 January 2007

Composite Fishing Hook

The composite hook has two advantages over the one piece hook: It's easier to make and the point doesn't soften up and become limp in the same way. It's main disatvantage though, is that you can't thread worms onto it. Below: The wood and the halibut bone.


For this particular hook I used a piece of split and dried rowan, a halibut bone (for the barb) and sinews for binding. This binding has to be waterproofed however, so I am looking to replace it with spruce rootlets in the spring. Below: The barb fitted onto the wood.


Carve the lower end to fit the barb.


Thin the rest of the hook and bind it, but sinew can't be bound in the same way as roots, which is much more elegant. I will show how to do that later.

Friday, 26 January 2007

Checking the Traps Again.

Due to a lot of work at school, my traps have been down for quite a while. I have now changed trapping location as I have found a place teeming with squirrels. A few days ago I set two deadfalls, both of them had signs of disturbance today. One had collapsed, but still rested on the upright stick, because of improper setting. A true newbie mistake... Below: See what I mean?


Here the trap is ready for action again.


The other one was obviously not sensitive enough, and the squirrels had eaten off the bait without releasing the trap. Below: Tracks from one of the squirrels who have had a feast on my almonds.


I am starting to become a little annoyed by the lack of sensitivity of the figure four trigger. Because of that I set a new trap, this time with the paiute trigger. It seems likely that I will more or less start using this trigger type on the nible squirrels. The stability of the figure four will however still be useful when trapping fox and other large animals. Below: A deadfall set with the paiute trigger.


In addition to this, the prototype trap was set to carry out the field tests.

Thursday, 25 January 2007

Antler Dagger

I always have plenty of antler tines and other leftover pieces that lie around unused. Being a little busy these days, I thought making an antler dagger, more or less like in the movie Braveheart would be a good idea. Below: The antler piece soaking.


First I split away most of the soft core.


The rest was carved away with one of the big, nice flakes I have traded for some sinew. Thank you Kevin.


The tip was abraded on a stone and the sharpest edges rounded in a similar fashion.


It may not look that much like a dagger, but has more the function of a primitive fighting glove. I expect it would do serious damage.

Wednesday, 24 January 2007

Different Things

As all stories doesn't reach the headline news, like that it is with the things I make and this blog. Here is a few things I've made recently that wasn't unique enough.

Here there is a small figure 4 deadfall trigger, a hare snare of sinew and a two very thin fishing lines of nettle. One with a new, small antler hook. These fishing lines are specifically aimed at getting those picky trout. The lines are really scavanged from the beginnings of the cordage that was originally destined to be used for a fishing net. It'll set me back a bit on that project, but not much.


I have also made a prototype trap. To my knowledge unique, although it is so simple that I'll expect that someone have thought of it before. It will be tested in the field in the nearest weeks.

Tuesday, 23 January 2007

Ice Fishing

Fishing with lines through the ice is not a particulary effective means of catching fish. But as with traps, they take little effort to set and they can fish for you while you are not present.

To achive a reasonably steady supply of trout throughout the winter, you are likely to need at least 20 lines out. Some days you will have many, but you will at least be almost certain to catch one every day. This of course depends on how numerous the fish is in the area in question. In some places you may get by very well on 20 hooks, other places that is way to little. If you have to set more than 20 hooks to get fish every day, I would seriously consider moving to a better fishing location. It takes time to check all of those hooks and if the return on them is poor, you may be better off spending more time on setting traps. But as a general rule: Fish is a more dependable food source than game.

One of the main advantages of fishing through the ice is that you need comparatively less line than when fishing from the bank. This being of the simple reason that the ice helps you drop the line straight down on the fish.

Setting a line and hook:

First, of course, make a hole through the ice. Make it bigger than you expect the fish in the lake to be. Scoop out the ice bits and snow out with your hands.


Bait the hook with something you know the fish like. Trout likes worms and other small creepy things. But these are hard to come by in winter, so they have to be stored. The Saami use reindeer fat. I have tried elk/moose fat and have yet to have any success with this. Other, more aggressive fish like pike, seems to like pieces or whole fish. Old bait doesn't work very well. The bait should preferably be changed every day.


The fish usually stand just a little over the bottom of the lake. So that's where your bait should be. Use a sinker to get the hook down. I often find that the best fishing locations to be where there is little water under the ice, maybe just a metre or two. Especially in the spring. In mid-winter they often stand deeper. Below: A line with a baited hook.


Tie it or wrap it securely around a stick at the desired depth. A few motions on the hook can often give you a fish right away.


Don't try to lift big fish directly out of the hole. Everything weighs less in the water. Grab it by the gills and lift it up. I have saved a lot of fish unhooking in the hole, by grabbing the confused, but freed fish down in the hole.

Make sure the line doesn't rest on one of the sides. Otherwise, when the hole freezes over you will have a lot more chopping on your hands, with the risk of cutting the string of course. Cover the hole with snow to reduce the freezing. Spruce boughs can be laid underneath, but I usually just showel a pile of snow over the whole thing. I have seen the Inuits make a small igloo over the hole, but I don't find it to give any advantages over the previous methods. If anything, it has to be less snow in the hole.


About safety. Check the ice on intervals to avoid falling through. Especially where there is fast flowing water. Carry a long stick if you are insecure about the ice. Then you can use it to climb back up on if your luck turns sour.

Monday, 22 January 2007

The Hoko Knife

Having seen the hoko knife in the Bulletin of Primitive Technology a few years back, I had forgotten about it until Diederik Pomstra showed me one he had made. Mine I made rather large and crude. I would have been much more gainly if it was smaller. But it definately was quick to make. Taking the (rather poor, I know) photos took longer.

The advantages with this type of knife:
  • Gives you leverage when using rather small blades.
  • No need for retouching to protect your hands. That saves on edges, which you need as you can get of in an as stone poor place as this.
  • Quicker than hafting in the regular fashion.
First, I broke off a piece of willow and split it down the middle just by seperating the fibres from the break. Don't split it all the way through. It will be useful to have the attached still connected to clamp the blade in place.


Start the wrapping by inserting the willow branch into the crack, on the inner side of the blade. Make a few turns around on that side before taking a wrap over the backside of the blade.


Wrap the other end tightly down to clamp the blade properly. Secure the small willow branch wrap by inserting it into the crack twice.


Not exactly a work of art, but very handy. And disposable too.

Sunday, 21 January 2007

Ice Pick Update

Finally I have finished this project. I did it very simply this time, as it is just meant to be a temporary haft so I didn't even use the holes. I simply cut down a piece of willow with my antler axe and split it with my antler wedge.


The head is inserted into the crack and the sinew rope is wound around it. To keep it from wobbeling in the crack, wind around the head as shown in this rather poor drawing.


The pick in use.

Saturday, 20 January 2007

Ice Fishing for Pike

Me and a chap named Øyvind was out ice fishing this morning for pike. I wanted to test my primitive ice fishing gear, but brought some modern stuff too. But even the modern stuff was very basic.

The ice was firm, but layered. Using the antler axe for chopping through was practically impossible. That is the main advantage of using a ice pick instead of an axe; you don't have to worry about the ice not being solid all the way through.


We got one non primitive hook out first. While I was making a new hole, he was making motions with the stick to try to make the pike to take. Suddenly the pike took the bait and I rushed to help. The hole was too small however and before we managed to enlarge it, the pike was gone with the hook and all. I think that, if we had planned a little better, we should have made a little gaff of a split branch, hooked it through the gills and used it for pinning the pike's head to the ice. That would have left us with more time to enlarge the hole.

After that we set one primitive set and one more modern. On the modern one, the pike left with the hook and bait, which was by the way herring. No contact yet on the primitive set, but they have all been left until tomorrow. Hopefully there will be something there then. I will also set another set of primitive hook and line to increase the chances of finally proving that these hooks are effective, even on hard mouthed fish like the pike.

Friday, 19 January 2007

Walking Barefeet

Since there isn't much to report from skillswise, I thought I'd give the readers a simple treatise on walking barefooted. Walking barefooted, however looked down upon in our society it has numerous advantages over using shoes. I have done this for several years during the warm season and find it much more comfortable than using shoes.

First on the advantages of going barefeet:

Hygiene
Having your feet exposed to water, dirt (which sucks up fats and moisture) and the sun washes, dries and condition your feet automatically. Shoes on the other hand, locks in moisture and promotes bacterial and fungal growth. At first it only creates annoying smells, but in time it can develop into quite dangerous foot-rot. There is a reason why all the rainforest tribes around the world go barefeet. Shoes would never dry up.

Foot health
If you ever have heard of massaging your feet. That happens all the time when you walk barefeet. Being as close to the ground as practically possible, it almost eliminates the chance of stepping over. It also trains your feet and legs (very much in fact) and toughens up the skin. Blood circulation is increased and that reduces freezing on your feet in winter. Something which I have barely done after I started to walk barefeet almost all the time.

Silence
There are three reasons why you walk silently without shoes.
  1. The pain of stepping on something sharp makes you take care when you step (effect is reduced as you toughen though).
  2. Better contact with the ground, when you feel the sticks directly you can avoid breaking them much easier.
  3. The sole of the foot is softer than that of the shoe.

Economy
Maybe not so relevant today, but in a time when you needed that leather for winter shoes you would want to save it by walking barefeet in summer. Modern shoes may not wear out so quickly, but moccasins, birch bark shoes and other natural shoes do. So, if you are going primitive for a longer period of time, you more than likely need to learn yourself to walk barefeet.

Limitiations
Like a heavily used horse, a human trekking for multiple days with a backpack over rough country and without rest will need some sort of shoe to avoid wearing down the sole underneath. The sole will regenerate, but you need to rest for that to happen. You will also need shoes on very hot sand, where there are a lot of thorns and in the snow. There are plenty of ethnographic examples that defy all of these, so it isn't written in stone.

Getting tough feet

Tough feet are unfortunately impossible to buy in a shop. Every spring I do this, as my feet has pretty much reverted by then. It will not revert all the way though, so it will not take as long as the first every time.

If you have extremely tender feet, start on grass and coarse sand. Walk around all day on this soft ground for several days, it should make your feet sore. Dont' bother resting after this small ordeal, but press on. On the days that come, start walking on very coarse asphalt and coarse gravel. That will be very painful and your feet will be very sore. When it gets so bad that you feel like tendons are pulling all over the place and blisters are forming. Take two days with shoes on.

After the rest, start walking everywhere without shoes. Especially in the forest, where the ling will whip the soft parts on top of the feet and toughen them too. Take two days with shoes whenever you feel blisters forming.

As you continue walking barefeet it will become second nature to you and you will loose your fear of stepping on something sharp and become able to run, even in the forest.

Thursday, 18 January 2007

New Fishing Hook

Little to write about these days. I have made another fishing hook of antler. I don't like the proportions of it, but it's usable. This time I used Patrick's method. Seems like I am going to stick with my own, I like it better.


And also, I have this bad habit when making hooks. If there is room in the width of a piece, chances I will use it, even if it doesn't give good results. The blanks I have ready now, I will halve. Hopefully that will make me do it properly.

Wednesday, 17 January 2007

Fishing Line Update

Not making much progress on anything today, I thought I'd post on pretty much the only primitive thing I did today. The rest of the elm bark I had from making the straps to the pack-frame will go into make a braided fishing line.

I need more fishinglines when the ice fishing season starts soon (very late this year). I also will need them on my expedition this summer.

The process is simple. The sheets are seperated into smaller sheets.


The sheets are plaited into a braid. It is very slow work. But the result is a very strong line.