The result is fairly pretty and I look forward to testing it, but the next time I will make a trap in the same way as the burden basket a little while ago. This method simply takes way too much time to be worthwhile.
Showing posts with label Wood. Show all posts
Sunday, 26 August 2007
Fish Trap
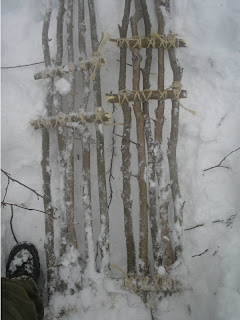
I've finally finished my fishing trap. This is the style Patrick McGlinchey uses and Jon have also made one of them. This trap is all willow and was quite frankly a pain to make. The willow bark works fairly well as a binding, but it takes time processing as much as you need. Compared to wickerwork it also seems to slip easier.
The result is fairly pretty and I look forward to testing it, but the next time I will make a trap in the same way as the burden basket a little while ago. This method simply takes way too much time to be worthwhile.
Sunday, 19 August 2007
Two New Creations
Nothing great to report. I've been gathering some nettle fibres for fishing lines, a carrying net and a fishing net. I have tested some new techniques for making willow basketry, since this was a crude attempt at a burden basket I will not post anything about the techniques I've tested them further and gotten better at it.
Both Patrick McGlinchey and Jon_R have recently been experimenting with coiled basketry and that has inspired me to give it a go. To start on this type of project I needed to make a needle first. This one is out of a thin, flat section of reindeer antler. I expect the thinness to be an advantage in this kind of work.
Tuesday, 13 February 2007
Evenk Berry Picker Update
Two years ago, I made a makeshift Evenk berry picker when out in a woods, inspired by an article on a Swedish site and later also by Ray Mears in a tv-series. I was surprised by it's efficiency, but the workmanship didn't hold up for long.
I have been thinking about making a new one for a long time, even gathered the bark and the spruce root, but it wasn't until there recently was announced a berry picker contest on bcuk that I got the neccesary kick in the behind.
What I have done yet is to gather the materials and to make the rim. This was done quite a while ago, this summer. The rim is of willow and could with advantage have been of another, more sturdy material, but in the very far north that is one of the few materials available. The willow is so weak in that after it had been split and thinned, I wrapped the opposite half on as a support. The bark is strong, taking away the strain on the back and the opposite half evened out the compression.
Compression fractures developed in one place, and that place was straightened with boiled water. To keep it firm until it dried, I bound down a bone piece with some rawhide.
Sunday, 11 February 2007
Willow Basket
Willow is very fast growing tree. That makes the wood weak, but the strong bark keeps an integrity to it. Harvest the red shoots, they are usually the best ones. The shoots that are still red has a large pith, but the bark is strong, so that they can be folded without breaking.
Harvest in winter, when the sap is down, the shoots seems to be less brittle then and their water content is lower. But still, dry them before you use them, to avoid the baskets becoming loose. It is better to reconstitute them afterwards, before using them. That wasn't neccesary with these shoots though, as they were so strong. When harvesting, there is no need for tools, the easiest method is just to rip them off the trunk with your hands.
To start the weaving, overlap four willows like on the photo. But four will not do it. It has to be an uneven number, otherwise the weave will end on the same place and that will not make a basket.
When you feel the gaps between the spaces become unmanagable, add in an even number of new strands. If you add in an uneven number, the result will be even and will not work (Said differently: Not 5+5=10, but 5+4=9.). Cut off all of the ends on the inside, as that will be hard to do on the finished basket.
When you have the size of the bottom you want, bend up the strands and tie them together in the top to keep them like that. Start weawing upwards. It is messy in the start, but if you are careful to keep the weave tight it will become progressively easier as you move upwards.
Weave it as high as you want it. When the top has become stable on it's own, you can release it in the top, that will make further weaving easier. Splice on the outside, as trimming later on the inside will difficult.

Cut off the tops at a good lenght. Make them pointy, that will make tucking them back into the weave easier. Tuck them back over into the neighbouring strand.

Finally, trim off all the ends and the basket is finished.
Harvest in winter, when the sap is down, the shoots seems to be less brittle then and their water content is lower. But still, dry them before you use them, to avoid the baskets becoming loose. It is better to reconstitute them afterwards, before using them. That wasn't neccesary with these shoots though, as they were so strong. When harvesting, there is no need for tools, the easiest method is just to rip them off the trunk with your hands.
To start the weaving, overlap four willows like on the photo. But four will not do it. It has to be an uneven number, otherwise the weave will end on the same place and that will not make a basket.
When you feel the gaps between the spaces become unmanagable, add in an even number of new strands. If you add in an uneven number, the result will be even and will not work (Said differently: Not 5+5=10, but 5+4=9.). Cut off all of the ends on the inside, as that will be hard to do on the finished basket.
When you have the size of the bottom you want, bend up the strands and tie them together in the top to keep them like that. Start weawing upwards. It is messy in the start, but if you are careful to keep the weave tight it will become progressively easier as you move upwards.
Weave it as high as you want it. When the top has become stable on it's own, you can release it in the top, that will make further weaving easier. Splice on the outside, as trimming later on the inside will difficult.
Cut off the tops at a good lenght. Make them pointy, that will make tucking them back into the weave easier. Tuck them back over into the neighbouring strand.
Finally, trim off all the ends and the basket is finished.
Friday, 2 February 2007
Elm Bow Update
I was aiming at getting a 60 pounder out of this stave. Due to a couple of bad decisions when I removed the bulk of the wood, I may be ending up with a 40 pounder. Not what I want, but it'll do until I make another one.
To day I started some initial floor tillering. It seems like the wood may be a month or so from being totally dry, but I got a feel of it still. The reason why I don't think it is totally dry is because it doesn't snap back, but retreats slowly. The tillering is done by watching the curve while flexing it onto the ground.
The adjustment is made by scraping with a sharp flake on the stiffest spots. Can't say I am as enthusiastic in regards to this bow anymore, but I will follow it through. Who knows, some extra seasoning, may add a few pounds of draw weight.
Thursday, 1 February 2007
Pack Frame Update
An advice for those who are going to make this themselves: Mortise the boards into the frame while the frame is still green. The hazel become remarkably hard to work after it has dried, mortising properly is next to impossible. What I did was to plane the surface down to make it flat and narrower, so that the cordage grips binds the boards more securely to the frame.
Tie the boards down very hard. Preferably with wet cordage, so that it will tighten up when drying and not loosen again when it becomes wet. I may have to redo just that, if it becomes a problem.
The straps are tied under the boards and the frame is now finished.
Tie the boards down very hard. Preferably with wet cordage, so that it will tighten up when drying and not loosen again when it becomes wet. I may have to redo just that, if it becomes a problem.
The straps are tied under the boards and the frame is now finished.
Wednesday, 31 January 2007
Traditional Squirrel Deadfall
Due to my very limited success with my improvised deadfalls, I decided to add a strictly traditional Norwegian setup to my line. The advantages of this design should be:
First chop the tree down. To give you as little chopping with the antler axe as possible, break it after only having chopped around slightly. Cut off where you find it to be a good length. Longer length makes for quicker action on collapsing.
Split it down the middle.

Wedge the bottom log between two trunks to make it sit securely. This will also make the upper log fall directly down. But you need to make sure you remove any twigs or cracked bark in the way, otherwise it will not fall freely.
I used a regular figure 4. I have found a way to make them more sensitive and more quickly producable with stone as tools and spruce twigs as materials.
The bait is walnuts, a bait I have had success with in previous years.
- The trap is put into the squirrel's domain, the conifer trees.
- The trap is set so high that it is harder for most predators to pick the squirrel out of the trap.
First chop the tree down. To give you as little chopping with the antler axe as possible, break it after only having chopped around slightly. Cut off where you find it to be a good length. Longer length makes for quicker action on collapsing.
Split it down the middle.
Wedge the bottom log between two trunks to make it sit securely. This will also make the upper log fall directly down. But you need to make sure you remove any twigs or cracked bark in the way, otherwise it will not fall freely.
I used a regular figure 4. I have found a way to make them more sensitive and more quickly producable with stone as tools and spruce twigs as materials.
The bait is walnuts, a bait I have had success with in previous years.
Tuesday, 30 January 2007
Pack Frame Update
Larch is not found naturally in Norway, but since I (unfortunately) live in a city at the moment, a lot of trees that are not natural is to be found there. Since larch was used on the original, I decided to go for this tree.
Larch is supposed to be exeptionally easy to split. That has to be trees with denser growth rings than this specimen. This one was quite hard to split properly, but the results were satisfactory. There was also a slight twist in the grain. But not more than I was able to even out on the planing.
Here my daughter seems to be working on something. Maybe she has some plans for the split log too.
Planing the planks thin and even takes a lot of time. Much more than one would expect it to. I used the big flakes I got from Kevin as drawknives and planers, alternating sides avoid digging into the twisted grain.
The ends were evened and notches were cut. To make sure that the frame isn't going to spread, one of the two boards are notched.
The only remaining task is now to mortise the frame and lash on the boards.
Monday, 29 January 2007
Roycroft Snowshoes
This type of survival snowshoes I have long wanted to build. I think they look horrible to be honest with you, but the simplicity was appealing. A warning: To save time, I used sisal ropes on this project. Sacrilegious, I know, but hopefully you will forgive me. :-)
First, You need ten small trees and 6 short halves. Try to use as small sticks as possible to reduce the weight. I used aspen, a very weak wood and consequently needed to use bigger sticks to compensate. If I'd used birch, rowan or even willow I would have been able to reduce the weight to more comfortable levels.
Anyway, bind 5 thick ends together onto a crosspiece, with some spacing. This will be the rear end.
Decide where the binding will be and bind another crosspiece onto it. The binding needs to be a little in front of the tipping point to make the snowshoes work properly. Measure where the heel of the shoe will fall and bind another crosspiece there.
Bind together the tip and lift it by binding it to the front crosspiece.

Make bindings. Just a thread over and one behind the shoe. Duplicate it to produce two snowshoes (hardly needed to say that, did I?).
Compared to traditional Canadian snowshoes, this is a terrible piece of equipment. Heavy and ungainly, but still far better than going without any snowshoes at all. For denser snow I would rather go for the traditional Norwegian style, which is much less encumbering. With the fluffy stuff we have here these days, you can clearly tell the difference. Below: Wading in the snow without snowshoes.
First, You need ten small trees and 6 short halves. Try to use as small sticks as possible to reduce the weight. I used aspen, a very weak wood and consequently needed to use bigger sticks to compensate. If I'd used birch, rowan or even willow I would have been able to reduce the weight to more comfortable levels.
Anyway, bind 5 thick ends together onto a crosspiece, with some spacing. This will be the rear end.
Decide where the binding will be and bind another crosspiece onto it. The binding needs to be a little in front of the tipping point to make the snowshoes work properly. Measure where the heel of the shoe will fall and bind another crosspiece there.
Bind together the tip and lift it by binding it to the front crosspiece.
Make bindings. Just a thread over and one behind the shoe. Duplicate it to produce two snowshoes (hardly needed to say that, did I?).
Compared to traditional Canadian snowshoes, this is a terrible piece of equipment. Heavy and ungainly, but still far better than going without any snowshoes at all. For denser snow I would rather go for the traditional Norwegian style, which is much less encumbering. With the fluffy stuff we have here these days, you can clearly tell the difference. Below: Wading in the snow without snowshoes.
Saturday, 27 January 2007
Composite Fishing Hook
The composite hook has two advantages over the one piece hook: It's easier to make and the point doesn't soften up and become limp in the same way. It's main disatvantage though, is that you can't thread worms onto it. Below: The
wood and the halibut bone.
For this particular hook I used a piece of split and dried rowan, a halibut bone (for the barb) and sinews for binding. This binding has to be waterproofed however, so I am looking to replace it with spruce rootlets in the spring. Below:
The barb fitted onto the wood.
Carve the lower end to fit the barb.
Thin the rest of the hook and bind it, but sinew can't be bound in the same way as roots, which is much more elegant. I will show how to do that later.
For this particular hook I used a piece of split and dried rowan, a halibut bone (for the barb) and sinews for binding. This binding has to be waterproofed however, so I am looking to replace it with spruce rootlets in the spring. Below:
Carve the lower end to fit the barb.
Thin the rest of the hook and bind it, but sinew can't be bound in the same way as roots, which is much more elegant. I will show how to do that later.
Monday, 22 January 2007
The Hoko Knife
Having seen the hoko knife in the Bulletin of Primitive Technology a few years back, I had forgotten about it until Diederik Pomstra showed me one he had made. Mine I made rather large and crude. I would have been much more gainly if it was smaller. But it definately was quick to make. Taking the (rather poor, I know) photos took longer.
The advantages with this type of knife:

Start the wrapping by inserting the willow branch into the crack, on the inner side of the blade. Make a few turns around on that side before taking a wrap over the backside of the blade.

Wrap the other end tightly down to clamp the blade properly. Secure the small willow branch wrap by inserting it into the crack twice.
Not exactly a work of art, but very handy. And disposable too.
The advantages with this type of knife:
- Gives you leverage when using rather small blades.
- No need for retouching to protect your hands. That saves on edges, which you need as you can get of in an as stone poor place as this.
- Quicker than hafting in the regular fashion.
Start the wrapping by inserting the willow branch into the crack, on the inner side of the blade. Make a few turns around on that side before taking a wrap over the backside of the blade.
Wrap the other end tightly down to clamp the blade properly. Secure the small willow branch wrap by inserting it into the crack twice.
Not exactly a work of art, but very handy. And disposable too.
Sunday, 21 January 2007
Ice Pick Update
Finally I have finished this project. I did it very simply this time, as it is just meant to be a temporary haft so I didn't even use the holes. I simply cut down a piece of willow with my antler axe and split it with my antler wedge.
The head is inserted into the crack and the sinew rope is wound around it. To keep it from wobbeling in the crack, wind around the head as shown in this rather poor drawing.
The pick in use.
The head is inserted into the crack and the sinew rope is wound around it. To keep it from wobbeling in the crack, wind around the head as shown in this rather poor drawing.
The pick in use.
Monday, 15 January 2007
Primitive Clamps
Clamps work in the opposite way of the wedge, holding things together rather than separating them. They are very useful and luckily also equally easy to make.
The first task you need to do is to grind, saw or chop off appropriate lengths of the stick that are to be made into clamps.
Secondly, you should tie it off in the middle to have a point where the crack is to stop. If you take it further up than the middle it may not stand the strain, despite the string. The string on this photo is a piece of sinew.

Now, drive the wedge into one of the ends and split it up to the string.
To use it, just put whatever you want held together into the split.
The first task you need to do is to grind, saw or chop off appropriate lengths of the stick that are to be made into clamps.
Secondly, you should tie it off in the middle to have a point where the crack is to stop. If you take it further up than the middle it may not stand the strain, despite the string. The string on this photo is a piece of sinew.
Now, drive the wedge into one of the ends and split it up to the string.
To use it, just put whatever you want held together into the split.
Saturday, 13 January 2007
Traps and Willow
Today I have been catching up on a few things I really should have done over the last days. First, my daughter and I was just up the road here to cut some willow, coppiced by the people maintaining the road, for baskets. There is quite a lot of them there, but my daughter got impatient, so I only got to collect a little before we had to go.
I used the no tools technique for gathering them.

A few points on willow for baskets:

After having left my daughter at home, I went into the woods. I fished out the elm bark from the stream it has been laying for several days. It is now drying inside.
I also checked my trap, the one on the ground I haven't bothered to set again, so it's the one in the tree I am talking about. The trap had collapsed, there was obvious signs that something had been chewing or pecking on the almond which was the bait. I didn't want to touch the bait with my hand to avoid contamination of my scent. So I left it as it was, since the trigger needed repair. What had released the trap I don't know, but there were lots of tracks from birds and squirrels around in the new snow. I obviously need to make the trigger even more nimble.
It is no coincidence that the first snow gives "results" right away. The snow covers the ground, making food scarce and taking risks to aquire easy food becomes more attractive.
And by the way, I have also taken in my bow-blank to make it dry properly before final tillering. Hopefully this wasn't to soon.

I used the no tools technique for gathering them.
A few points on willow for baskets:
- The red ones seems better than the ones that have gone green.
- Cut them in winter, when the sap is down.
- Don't scrape off the bark, that is where the strenght lies.
- Dry them before using them, otherwise your baskets will become loose.
After having left my daughter at home, I went into the woods. I fished out the elm bark from the stream it has been laying for several days. It is now drying inside.
I also checked my trap, the one on the ground I haven't bothered to set again, so it's the one in the tree I am talking about. The trap had collapsed, there was obvious signs that something had been chewing or pecking on the almond which was the bait. I didn't want to touch the bait with my hand to avoid contamination of my scent. So I left it as it was, since the trigger needed repair. What had released the trap I don't know, but there were lots of tracks from birds and squirrels around in the new snow. I obviously need to make the trigger even more nimble.
It is no coincidence that the first snow gives "results" right away. The snow covers the ground, making food scarce and taking risks to aquire easy food becomes more attractive.
And by the way, I have also taken in my bow-blank to make it dry properly before final tillering. Hopefully this wasn't to soon.
Sunday, 7 January 2007
Pack Frame Update
Inspired by Oetzi's packframe I have decided to make one for myself. Hazel is a wood with most excellent bending qualities and was the wood used in the original. Consequently I chose to use this wood as well. Cutting down the tree is simple enough, but I struck stone with my antler axe, giving it a serious dent in the edge. Clearly one of the reasons that natives often cut trees with long stumps. Because of very few good speciemens, I didn't have that luxury however.
To make the stave bend on a particular location and without serious cracking, the wood is thinned in the future bend. Thin from both sides and preferably a rather long section, to make the bend more gradual. Compared to the original, my bend is too short. Thus making the frame narrower than the original. To compensate for this, I think I will leave the frame slightly triangular. Below thinning the tree.
The rest of the sapling was debarked with the cannon bone scraper.

I used hot water to bend the wood. When the wood is fresh like this, you don't need much hot water to bend it. Notice the string holding it together while it's drying.
To make the stave bend on a particular location and without serious cracking, the wood is thinned in the future bend. Thin from both sides and preferably a rather long section, to make the bend more gradual. Compared to the original, my bend is too short. Thus making the frame narrower than the original. To compensate for this, I think I will leave the frame slightly triangular. Below thinning the tree.
The rest of the sapling was debarked with the cannon bone scraper.
I used hot water to bend the wood. When the wood is fresh like this, you don't need much hot water to bend it. Notice the string holding it together while it's drying.
Subscribe to:
Posts (Atom)