Showing posts sorted by relevance for query ice fishing. Sort by date Show all posts

Tuesday, 23 January 2007

Ice Fishing

Fishing with lines through the ice is not a particulary effective means of catching fish. But as with traps, they take little effort to set and they can fish for you while you are not present.

To achive a reasonably steady supply of trout throughout the winter, you are likely to need at least 20 lines out. Some days you will have many, but you will at least be almost certain to catch one every day. This of course depends on how numerous the fish is in the area in question. In some places you may get by very well on 20 hooks, other places that is way to little. If you have to set more than 20 hooks to get fish every day, I would seriously consider moving to a better fishing location. It takes time to check all of those hooks and if the return on them is poor, you may be better off spending more time on setting traps. But as a general rule: Fish is a more dependable food source than game.

One of the main advantages of fishing through the ice is that you need comparatively less line than when fishing from the bank. This being of the simple reason that the ice helps you drop the line straight down on the fish.

Setting a line and hook:

First, of course, make a hole through the ice. Make it bigger than you expect the fish in the lake to be. Scoop out the ice bits and snow out with your hands.


Bait the hook with something you know the fish like. Trout likes worms and other small creepy things. But these are hard to come by in winter, so they have to be stored. The Saami use reindeer fat. I have tried elk/moose fat and have yet to have any success with this. Other, more aggressive fish like pike, seems to like pieces or whole fish. Old bait doesn't work very well. The bait should preferably be changed every day.


The fish usually stand just a little over the bottom of the lake. So that's where your bait should be. Use a sinker to get the hook down. I often find that the best fishing locations to be where there is little water under the ice, maybe just a metre or two. Especially in the spring. In mid-winter they often stand deeper. Below: A line with a baited hook.


Tie it or wrap it securely around a stick at the desired depth. A few motions on the hook can often give you a fish right away.


Don't try to lift big fish directly out of the hole. Everything weighs less in the water. Grab it by the gills and lift it up. I have saved a lot of fish unhooking in the hole, by grabbing the confused, but freed fish down in the hole.

Make sure the line doesn't rest on one of the sides. Otherwise, when the hole freezes over you will have a lot more chopping on your hands, with the risk of cutting the string of course. Cover the hole with snow to reduce the freezing. Spruce boughs can be laid underneath, but I usually just showel a pile of snow over the whole thing. I have seen the Inuits make a small igloo over the hole, but I don't find it to give any advantages over the previous methods. If anything, it has to be less snow in the hole.


About safety. Check the ice on intervals to avoid falling through. Especially where there is fast flowing water. Carry a long stick if you are insecure about the ice. Then you can use it to climb back up on if your luck turns sour.

Saturday, 20 January 2007

Ice Fishing for Pike

Me and a chap named Øyvind was out ice fishing this morning for pike. I wanted to test my primitive ice fishing gear, but brought some modern stuff too. But even the modern stuff was very basic.

The ice was firm, but layered. Using the antler axe for chopping through was practically impossible. That is the main advantage of using a ice pick instead of an axe; you don't have to worry about the ice not being solid all the way through.


We got one non primitive hook out first. While I was making a new hole, he was making motions with the stick to try to make the pike to take. Suddenly the pike took the bait and I rushed to help. The hole was too small however and before we managed to enlarge it, the pike was gone with the hook and all. I think that, if we had planned a little better, we should have made a little gaff of a split branch, hooked it through the gills and used it for pinning the pike's head to the ice. That would have left us with more time to enlarge the hole.

After that we set one primitive set and one more modern. On the modern one, the pike left with the hook and bait, which was by the way herring. No contact yet on the primitive set, but they have all been left until tomorrow. Hopefully there will be something there then. I will also set another set of primitive hook and line to increase the chances of finally proving that these hooks are effective, even on hard mouthed fish like the pike.

Tuesday, 28 November 2006

Ice Fishing Stick Update

I had really decided to just follow one project, per material at the time, but since this project is quite different from the ice pick handle project I will follow both, even if both are of wood. It will also make things more interesting for you, when I post the report from this winter's first ice fishing trip.

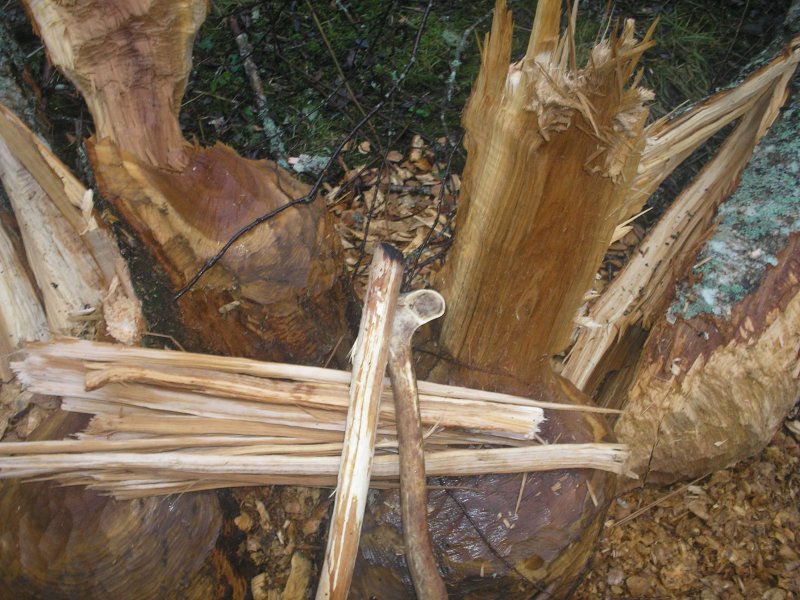
Was out where I knew there are some felled rowans yesterday. The rowans are of quite impressive size, but that seems like poses little problem to the beavers. It is nice to have someone do most of the work for you. :-)


The part of this mess I liked the most was this bundle of splinters. They can be made into varius gear with little work. Many of them will probably be utilized as arrow foreshafts.


Here is the bunch of splinters along with a batton, though really unrelated to this picture, and the antler axe I used to chop them off.


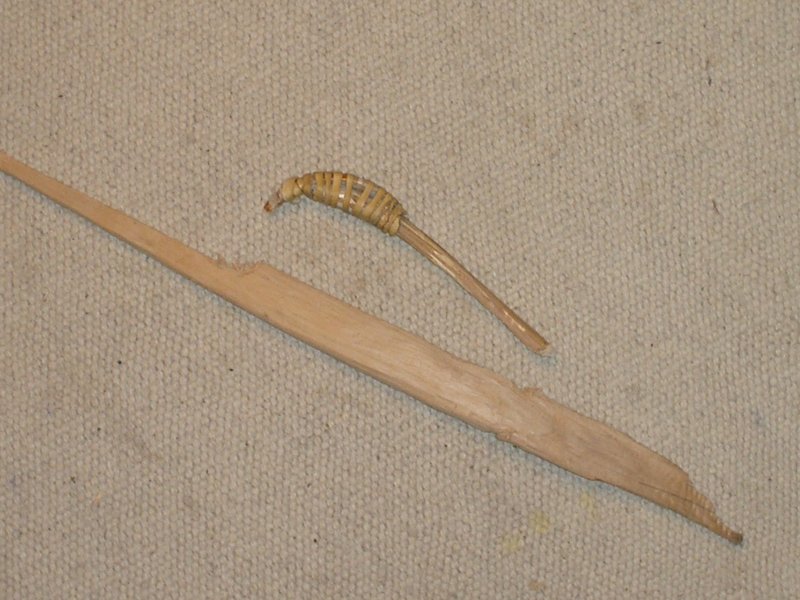
One of the wider pieces I chose to make an ice fishing stick from. I have made such before with metal tools and like them a lot. The only place I have seen such sticks elsewhere is among the Saami, where I first observed it.

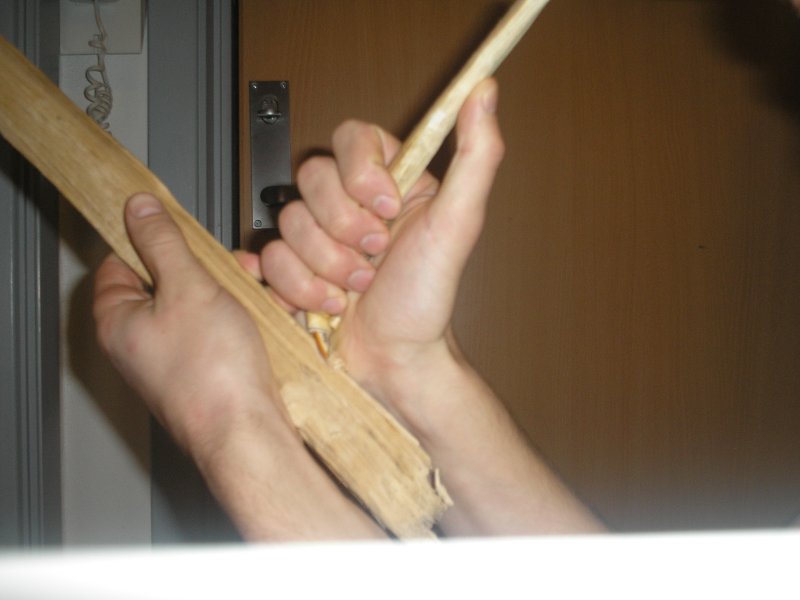
The first task is to chop it to a fairly uniform thickness. The wood was fairly dry. Not optimal for chopping with an antler axe, but it still worked fairly well. Notice that the piece is supported against a log while working, instead of ontop of the log as commonly done with metal axes.


When I got home, I used my beaver teeth knives to whittle down the blank to become even more uniform.


When the blank was acceptably even, I used the same knives to cut off one end. These tools are remarkable when cutting notches. I can't wait to use them on the stone-age bow I have plans for this winter.

Wednesday, 27 December 2006

Wild Food

Fish

Fish is and was, contrary to common belief, a staple for most primitive people, often more so than the big ungulates. Especially lake fish is confined to a limited environment and is because of that a much more reliable food source than for instance the reindeer, whose pattern of travel may vary to a great degree year over year. Getting close enough to catch them is also an issue, while the fish is easy to lure into your traps and nets by exploiting their quite limited intelligence.

In my area there are very few fish species. Mainly trout (Salmo trutta), but also arctic char (Salvelinus alpinus) and/or the common whitefish (Coregonus lavaretus) in some lakes. These are some of the most widely distributed anyway, so even if my experience is to a great deal limited to these species, the knowledge will be useful in a lot of places. Many of the methods can also be used for other species as well, maybe even in the sea for all I know.

The Trout

Fishing for trout in substantial quantities is difficult because of their solitary nature. At one time of they year, they are however exceptionally easy. When the trout runs on the rivers or streams to spawn in the autumn they can easily be caught, even with the hands. Photo shows lots of small trout caught in a few hours. The dark skin comes from living in a lake heavily influenced by bog water.


The most common method of hand fishing is called “tickeling”. Being rather basic animals, the trout believes that it is hidden whenever it can't see anything. Consequently, you can quite often spot the tail of the trout under a log or a rock. But anyway, chances are that you will see where the fish swims away from you and into hiding. By gently stroking the trout from the tail and forwards it will stand still, because it actually likes it. That affection is likely to come to an abrupt halt when you suddenly grab it by the gills and throws it ashore. Fish in hiding can also be speared, by for example probing under a bank.

You can also use spears, clubs or whatever to take out the fish. The club works best with a run and hit tactic. By running into a river and bashing at everything that moves you can kill or stun a few fish. Leave the river alone for a few hours and repeat the procedure.

Spearing with a torch is very, very efficient. The light calms and attracts the fish. But the torch has to burn brightly, without being made with either fat, birch bark, pitch or fat wood as a component, chances are the fish will not be mesmerised. When spearing fish, aiming at the neck makes for the surest kill, but be aware of that the light bends in the water. Sneak the spear slowly towards the aiming point of the fish (through water if needed) and thrust in an explosive movement. The spear is usually held in the right hand while you hold the torch with the left. Put your hand far up the spear to get most control and force. Pin the fish to the bottom until you manage to grab it with your hand to bring it on shore. With this method you can easily spear dozens in a short time.

If you have a net, chasing (by throwing rocks) the fish into the net or seine-netting a pool can give you hundreds at a time. Alternatively, block the passage of the water with a wall, leaving only a little opening where you set your landing net you can get quite a few fish too. Then start scaring the fish from above and into the only available exit, which is your net. Where the fish run on the exit river of a lake this can be used as a permanent installation, emptied every day. A related method is the fish basket, where the funnel inside guides the fish into the basket, but their limited intelligence make them unable to find the exit. This trap can be used in conjunction with a wall in an upstream run. Below is a crude basket trap.


Not all trout spawn in rivers or streams, some spawn in the lakes and all the fish in a lake doesn't spawn each year, particularly in lakes with bigger fish. Because of that, setting nets on strategic locations around the lake can bring a good catch. Such locations are usually inlets, outside of peninsulas or river out or intakes.

The same goes for spring. But particularly newly ice-cleared river intakes are sought by the winter-lean trout, seeking food brought by the flooding rivers or streams. Setting a net there overnight will often yield a good catch.

Summer is a poor season for fishing. The water is too hot for much movement and the brightness reveal your nets to the fish. Instead of using nets at this time of year, this is the time when the hook and line represents the best available alternative. For a more industrious approach; baited long-lines.

The fish move less in winter, but can still be caught with hook and line. In the winter the fish is found in deeper portions of the lake, but as spring approaches they move closer to shore. Netting under the ice is somewhat efficient on trout, but far more so on the next species described.

Arctic Char

Of these three species, the one I have the least experience with. It is a social fish, running in shoals. It is mostly pelagic and quite hard to catch in summer time, especially on lower altitude lakes where it goes deeper than the trout. Below: Small arctic char caught in ice fishing.


In late autumn (November approximately) the char goes into shore to spawn and is then to be found in very large shoals and is easily caught with nets. If there is ice you can either put nets under the ice, fish with bait or spear the fish like the Inuits sometimes do. The char is quite easy to catch under the whole period with ice.

Common Whitefish

This fish also moves about in shoals and due to a small mouth almost impossible to use hook and line on. Nets are about the only good option for this specie. A few places it runs in slow flowing rivers, but for a great part it spawns in the lake itself. In summer it is usually found in the deeper portions of the lake, but some can be caught in the shallows too. The fish spawns in late October and November, by setting nets outside peninsulas at that time you can catch lots and lots of this fat fish. If the ice is firm, you can also set nets under the ice, which can provide you with whitefish throughout the winter. How to set nets under the ice will be described in a seperate article as the procedure is quite complicated. The spring is also a reasonably good time to catch this fish in nets, but the fish is, as everything else, leaner then.

Dressing the Fish (illustrations will be edited in as they become available)

Start the cut by inserting the tip of the knife in the anus. Cut up all the way until you reach a harder structure almost at the throat. Rip up the tongue and gills from underneath the gill cover. Stick a finger into the throat and rip the pectoral fins off and the entire digestive system with it. Optionally you can scrape out the “kidneys”, a blackish substance sticking to the back from the inside commonly believed to be blood. If you are to fry the fish, skinning or scaling the whitefish is recommended. Of the organs, all can be eaten, including the roe and sperm. Photo is of me, dressing a few trout in front of the lavvo.


Cooking fish will be handled in a later article. This article series will be temporarily discontinued until I have enough photographic material to post the remaining articles (Mammals, cooking, shellfish, seaweeds, lichens etc...).

Friday, 1 December 2006

Ice Fishing Stick Update

Today I finished the last bit of wood working on the ice fishing stick. These pictures are taken over several days at different locations, just to avoid confusion. ;-)

Continuing where I left you on the previous update. After the blank was pretty uniform I split of some excess wood from one side. Splitting is by far the quickest way of removing material, but if done recklessly it can ruin the whole piece.


A way of control the splitting is to carve a notch in the end where you want the split to end and split out a piece, carve a new notch and repeat the process until you are pretty close to the desirable dimensions. It is slow, but a lot faster than carving or grinding it all down.


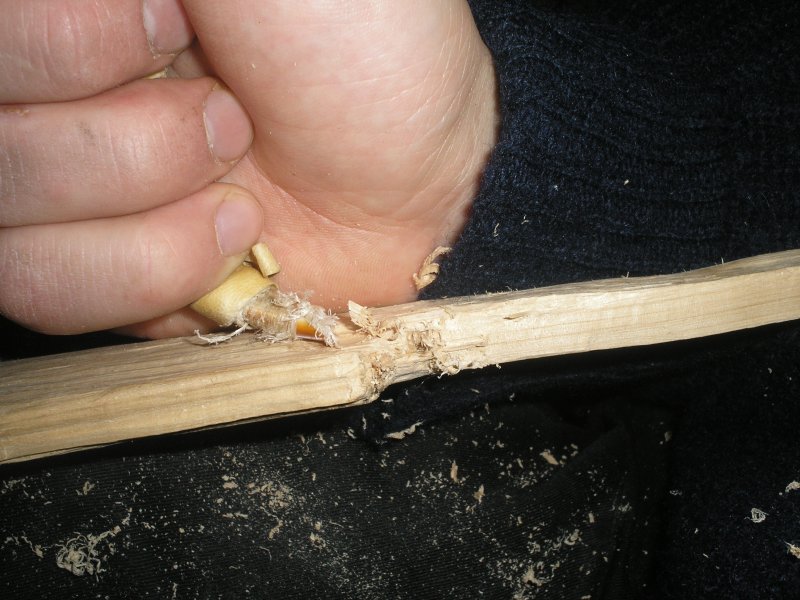
When carving a notch a strong edge is preferable, but beaver teeth isn't sharp enough to be as efficient as flint when planing or scraping a surface.


The notch in the front, where the string will be winded up on are cut with the beaver teeth. The other side I carved half way through, then abraded a little more with a rock and broke off in a quite controlled fashion. After cleaning up, the other end had a notch cut in as well.


The edges are rounded with a flint flake and the whole thing is abraded to a more even result.


The only remaining woodworking task remaining now is to drill a hole to tie the thread through. All else is antlerworks and lashing.

Wednesday, 17 January 2007

Fishing Line Update

Not making much progress on anything today, I thought I'd post on pretty much the only primitive thing I did today. The rest of the elm bark I had from making the straps to the pack-frame will go into make a braided fishing line.

I need more fishinglines when the ice fishing season starts soon (very late this year). I also will need them on my expedition this summer.
The process is simple. The sheets are seperated into smaller sheets.


The sheets are plaited into a braid. It is very slow work. But the result is a very strong line.

Saturday, 2 December 2006

Ice Fishing Stick Update

Today I drilled the hole for tying the thread. Here is the materials of the drill:
- Wild rose hand drill shaft. This one was previously used for fires, but is notched to recieve the flint tip.
- Flint tip. This a very worn one. And has been reworked several times.
- Reindeer sinew.


The bit of this drill was rather broad. So, instead of ending up with a giant hole, I drilled from both sides. The problem is however, to align both of the holes so they hit eachother in centre. It isn't as hard as it may seem. By drawing or eysighting from two sides you will get the pretty much exact coordinates on where to place the drill on the other side.


When I sense that the holes from either side are pretty close, I puncture the remaining gap with an awl. I had no bone awl available (should be on my todo list) so I used a sharp leftover piece from making the ice pick. The hole may be hard to spot, but if you zoom in you will barely see it. Pretty much just big enough to my fishing line.


To compensate for the short and rather unsubstantial post today, I will post on how to prepare nettle fibres later this evening. A topic I know a lot of people is struggeling with.

Sunday, 19 November 2006

My primitive gear

I was going to post this tomorrow, but being of a rather impatient nature I decided I wanted to do it today. Not all of the equipment on display is relevant to the trip I am planning. Some of it has been made for the bow I am planning on making this winter and some of it is winter gear. And it does not include a few things such as my sling, which I was unable to find and my coracle, which is spending the winter in the forest.

Picture number one is of my hide bag (1.) where I carry most of my smaller tools. It is made of brain tanned roe deer hide. The two sticks (2.) are throwing sticks for killing small game. Very effective, or at least, so they say.... Made from rowan.

Picture number two is of most of my stuff.
1. A string for bowdrill. Twisted from sinew.
2. Braided fishing line from nettle.
3. Sinker, just a long stone.
4. Two fishing hooks. The big one is of birch, the small one of sheep bone.
5. Three fishing hooks and a spoon lure. One of the hooks is composite (aspen, sinew and halibut bone). Two are made from reindeer antler. The spoon lure is made from elk (moose) antler, with an elk (moose) antler barb attached. All of them have leaders attached.
6. Bowstring of sinew.
7. 3 wedges of elm wood.
8. Bone arrow head.
9. Three pieces of antler to be made into barbs of a fishing spear (unfinished)
10. Pike hide bag.
11. Leader of nettle.
12. Double axe of red deer antler. Worked well, despite a rather thin handle of wild rose. Needs a lot of repair (grinding.
13. Two beaver tooth knives.
14. Two needles. One from a leg bone of duck. One is reindeer antler.
15. Hare snare of sinew.
16. Flint knife with reindeer antler handle. Birch bark sheath.
17. Wish bone hook. Bone is from ptarmigan.
18. Pressure flaker. Split from reindeer antler.
19. Pressure flaker/hammer. Elk (moose) antler.
20. Wedge of elk antler.
21. Four flint arrow heads.
22. Rimmed birch bark eating bowl. A little assymetrical and cracked.
23. Antler axe of red deer antler.
24. Unfinished arrow point of antler.
25. Two celts of pecked and ground stone. One finished and one not.
26. Reindeer antler needle blank.
27. (Two of them it seems, this one is the left one.) Blank of reindeer antler, half finished ice pick.
27. Unfinished deer snare.
28. Elk (moose) antler axe. Big and heavy. Needs a shaft and more grinding.
29. Soon to be split out antler wedge. Elk (moose).

Two hoops to be made into two survival bear paws. No fancy stuff, just to keep afloat. I will make better ones another time.

Thursday, 7 December 2006

Ice Fishing Stick Update

The antler rod eye is a neat thing I picked up from Patrick McGlinchey from Backwoods Survival School. Making them is rather easy, but don't do like me and choose a tine. A stem portion of female reindeer would be a lot better, since tines are frequently solid all the way through.

First start by scoring out the layout of the eye on the antler.


Score through the angled piece.


After that is done, split it with an antler wedge.


The eye is abraded on a rock to get the desired shape as that is more easily accomplished while it is still attached in the other end. Next by using the two saw flakes on the photo, I had to saw almost all the way through. A very good reason to choose a piece of antler with a pith.


The hole I drilled by holding it with my toes. I ask for apologies if my rather hairy toes prove to be offensive to anyone. :-)


The finished piece is bound to the the stick itself piece with a few strands of nettle. I'll see later if I will pitch the wrapping, but in essence, the stick is ready to use.

Thursday, 30 November 2006

Out and about

Was out for a little while today. Not exactly a pristine area, but about as good as you get this close to a city. Made a fire, sat down and worked on my ice fishing stick. Also pitched a few hooks and guess what... I had batteries for my camera today as well.

Saturday, 25 November 2006

A day in the woods

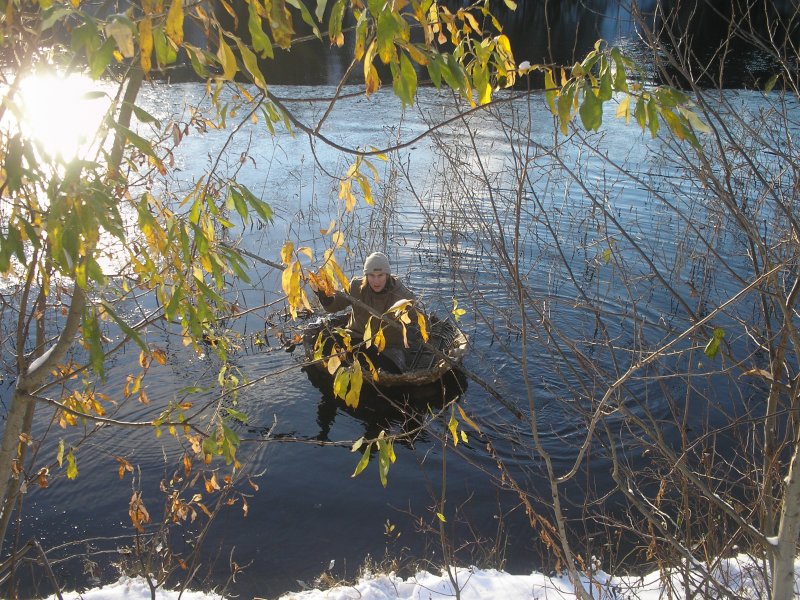
Was out in the woods for awhile today. My camera turned out to have empty batteries... So no pictures, but it was quite a nice trip. I checked the condition of my coracle, hanging in a tree up there. It is all dried up now and looks good. This is a picture from the maiden voyage of this vessel.


I also located what I will turn into the shaft of the ice pick and pitched two of my fishing hooks.

Friday, 15 December 2006

Coracle

The coracle is probably one of the most ancient and widely used vessels around. Although it may not have the grace, manoeuvrability and speed of the canoe, it is very quick and easy to build. Where I come from a small coracle is much more useful than a canoe. The place is hilly, with lots of small shallow streams and small to medium sized lakes. Using a canoe outside the main valleys would involve a lot of portaging. A coracle on the other hand could easily be carried around from lake to lake and you would still be able to carry your basic survival and fishing gear at the same time.

Being a purist, there is no other road for me than using stone age tools only. To accomplish that I found that the Welsh coracles were too complicated without adding a lot of work to it. As one of the great advantages with the coracle is the simplicity I decided to settle for an Irish type called the “Boyne currach”, with one modification: Making a seat seat would involve a lot of chopping with a stone axe or a long time searching for a suitable, wind broken tree. Because I left out that detail, it ended up resembling the Native American bull boat in that manner.

The construction begins with putting an equal number of thumb-thick saplings in the ground, opposite of each other on two of the sides. For easier penetration of the ground it is a big advantage if the saplings have already been broken to a point while harvesting. After all of them has been placed in the way they are supposed to, all of them are bent over into the hole of the sapling stuck on the opposite side, creating a number of arches. Since it is desirable to maintain a reasonable stability to the coracle, you need to weigh down these arches to flatten the bottom.


The same process is repeated on the other two sides, but here it will be a little more messy, since the saplings has to be stuck underneath afterwards. Now you are probably thinking: Why weigh down the arches before making the second ones? Actually, I have tried both. I finished a frame that became far too big for the hide I managed to obtain. On that one I made all the arches before weighing it down. It worked, but it was quite a puzzle to manage all of those rods at the same time. If you weigh down from one side first, you can just press the next ones underneath the first ones and get the correct depth at once. On tip when making the frame: The longer between the rods, the more likely that the frame will lose it's shape later. The corners are especially important in that respect.


After the frame is weighed down and the depth is approximately the same all around (and even if it isn't, that can be adjusted in the end) you can start weaving. Since the frame consists of an equal number of rods, you need to weave in layers upwards instead of a continuous weave. Use smaller saplings than on the frame and substantial overlap when adding a new sapling. The further up the frame you weave, the less likely it is that the frame will loose it's shape when you take the frame out of the ground.


The first frame I made I let dry for about a month in the ground. When I pulled it up it kept shape reasonably well, but scraping on the bark revealed that it was still quite green. The second one I started and finished in the same day and it spread out quite badly. So instead of having steep sides, it resembled a river Severn bowl coracle in shape. Nothing wrong with that really, except a loss of stability. Next time I will build the frame months in advance, in dry and sandy soil so the frame will stay exactly the same when I pull it out.

Anyway, after you have finished the frame, pull it out and break off the ends of the rods that has been stuck in the ground. The only thing that is left then is to attach the skin.


The elk (moose) skin I got from a local slaughterhouse. No one uses the skins any more, so I got it for free. To make the coracle as light as possible, the hide was soaked and the hairs removed. After having measured the a proper fit on the frame I cut the hide with a freshly made flint flake. Here is a couple of lessons to be learned. Use a flake with a long working edge, otherwise it takes A LOT of time. Also, the hide is very thick, so the edge dulls quickly. Make a new one as soon as it starts to dull, a sharp flake is a pleasure and the used flakes can be remade into arrow points or whatever.


Finally you need to cut some long strips of the leftover hide pieces to tie it to the frame. Make a hole at least for every rod that stuck in the ground and tighten it down over the weave and behind the arch. Hard to explain, it is better to have a look on the picture. There was a bullet hole in the skin. To remedy that problem I simply stuck a small, dry piece of wood into it. When the hide dried up it kept tight in the hole. The photos are of the drying coracle in the tree and the dried coracle.


Testing the coracle was somewhat scary. The ice was starting to freeze over the pond I planned to test it on. Because of that I had to choose a spot where it was deeper close to shore. Hardly an ideal spot to practise using this craft. Despite being a little low and unstable, consequences of the frame not keeping it's shape perfectly after pulling it out of the ground, it seemed to handle well. I didn't have a paddle yet, so I don' really know though. But I got to experience that it requires a lot of effort in the way of keeping it stable. To remedy the drawback with instability and making it usable for crossing bigger lakes, further experimentation with temporarily building it into a very simple raft will be carried out. But as pointed out earlier, making the coracle a little bigger, and making the bottom totally flat would make it more stable in the first place.